How can I create the fields I want to capture in my inspection report?
Once you have your category and sub-category/equipment types set up, you can now pick the “Sections” you want to include to the sub-category. These will be the group of fields in your inspection report for that equipment type.
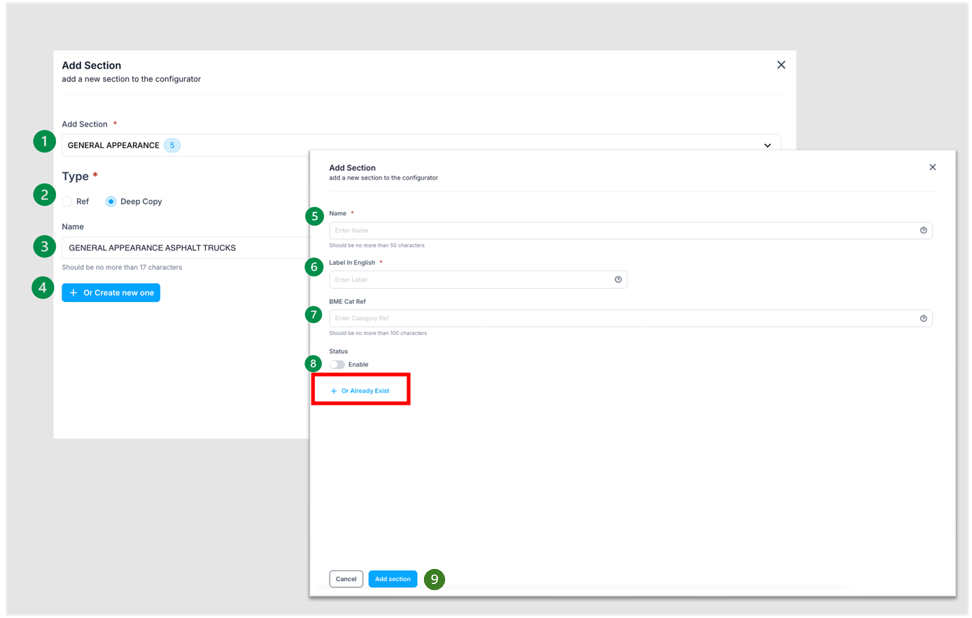
To do this, click on the drop-down menu for “Add Section” (1), where you’ll see the available options to choose from.
If you choose one of the pre-loaded sections, select it from the drop-down menu. You will then see two Type options (2): ‘Ref’ or ‘Deep Copy.’
§ Choose “Ref” if you want any changes made to it will be reflected everywhere.
§ Choose “Deep Copy” if you want the change to apply only to this sub-category. We recommend always going for this option.
If you go for “Deep Copy” you will have to choose a name (3) for your section. This name will be the section name visible on the app.
If you go for “Create a New One” (4), click on the button, and then start filling out the fields presented:
Name (5): The internal name for the section.
Label in English (6): The public name of the section, displayed in English. If any other languages have been selected these will be available alongside the English field too.
BME Cat Reference (7): This refers to an XML-based standard developed by the German association BME for the electronic exchange of product catalogue data between suppliers and buyers. It enables machine-readable data integration with systems such as ERPs, PIMs, and e-commerce platforms, ensuring efficient and accurate data communication in B2B transactions. If applicable, you can use this field to align your categories with external systems or catalogues. This field is optional and only necessary if it’s relevant to your workflows.
Status (8): Enable or disable the category, this can also be updated later from the dashboard.
Click on “Or Already Exist” to go back to picking one section that already exists.
Once you have finished adding a section—either by selecting a pre-existing one or creating a new one—click “Add Section” (9) to complete the process. You can add as many sections as needed by simply repeating the same steps.
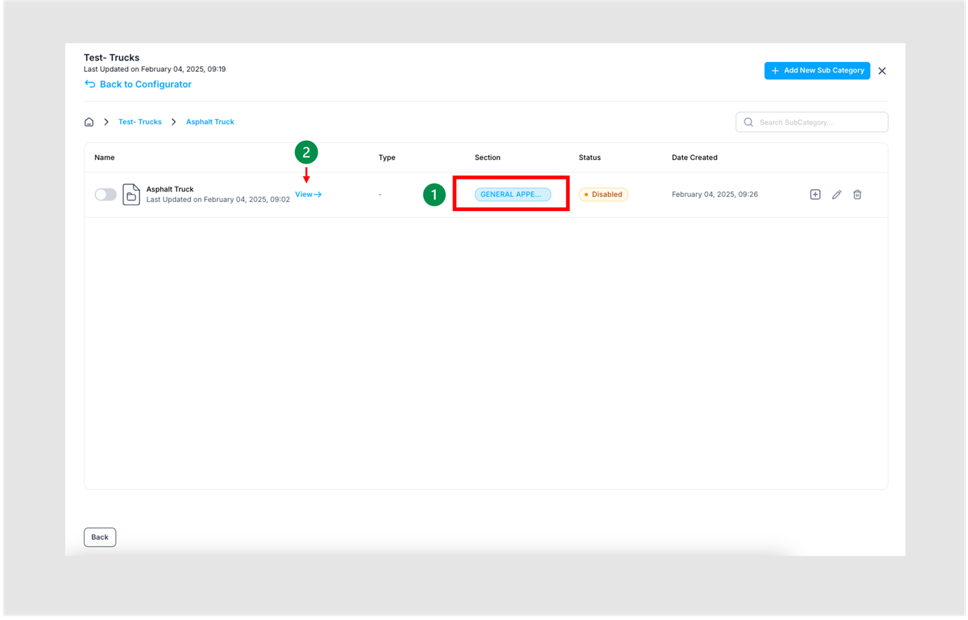
Your new section has been successfully added to the sub-category and will be listed under “Section” (1). You can now click on View (2) to view all fields set up here and further configure the next level.
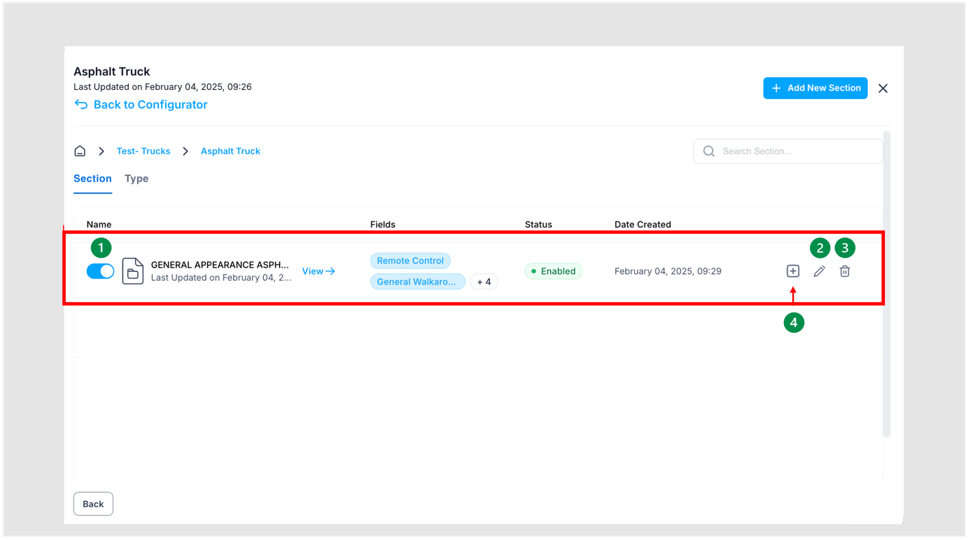
Once you reach the new screen, you will see the sections, including the one you just created. You can “activate” or “deactivate” a section by clicking on the toggle (1), Edit it (2), Delete it (3), or “Add a New field” (4).
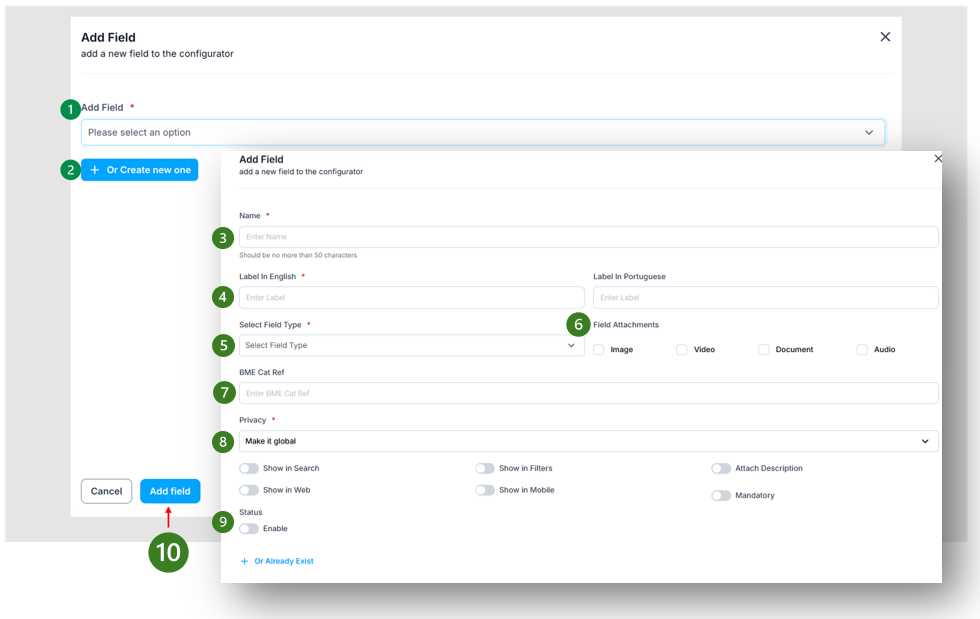
Clicking “Add a New Field” (4) You can now decide on the specific field details you want to capture in each of the Sections.
To do this, click on the drop-down menu for “Add Field” (1), where you’ll see the available options to choose from.
Alternatively, you can “Create a New One” (2). If selecting this option, click on the button, and then start filling out the fields presented:
Name (3): The internal name for the field.
Label in English (4): The public name of the field, displayed in English. If any other languages have been selected these will be available alongside the English field too.
Select Field Type (5): Select the most suitable input type for your field, such as numeric, text, drop-down, etc.
Field Attachments (6): Decide whether your field should allow attachments, such as an image, video, document, or audio.
BME Cat Reference (7): This refers to an XML-based standard developed by the German association BME for the electronic exchange of product catalogue data between suppliers and buyers. It enables machine-readable data integration with systems such as ERPs, PIMs, and e-commerce platforms, ensuring efficient and accurate data communication in B2B transactions. If applicable, you can use this field to align your categories with external systems or catalogues. This field is optional and only necessary if it’s relevant to your workflows.
Privacy (8): Set the privacy level for your field. Select “Make it Global” to make it available to everyone or choose a different option from the drop-down menu. The following toggles are not relevant for Inspeq use, except “Mandatory” which allows you to choose if this field must be completed by the user.
Status (9): Enable or disable the field, this can also be updated later from the dashboard.
Once you have finished adding the field—either by selecting a pre-existing one or creating a new one—click “Add Field” (10) to complete the process. You can add as many fields as needed by simply repeating the same steps.